


The TL;DR
Building an MCP server is simple in theory and easy to get wrong once you’re actually building it, where a handful of small details decide whether it works.
-
• What You’ll Build
A Python MCP server with one working tool, tested in MCP Inspector, then connected to Claude Desktop or Cursor.
-
• Get These Right
Pin your SDK version, keep stdout clean on stdio transport, and validate every input before it reaches a tool function — the three details that break most first attempts.
Most MCP tutorials stop at hello world. Then the tool call fails in Claude Desktop, the terminal shows nothing useful, and the debugging starts with no idea which half of the system is broken.
The failures that matter happen around the tool function, not inside it. A stray print statement can silently kill a stdio server. A relative path that works in your terminal can fail the moment a desktop client launches the same script. An unpinned SDK install can jump to a breaking major version between the tutorial you’re reading and the terminal you’re typing into, which is exactly what happened days ago when the MCP Python SDK shipped v2.0.0 and quietly renamed the class this tutorial builds on.
Every decision below, including the security ones, gets made in the first version of the code. Not bolted on after something goes wrong.
What Is an MCP Server?

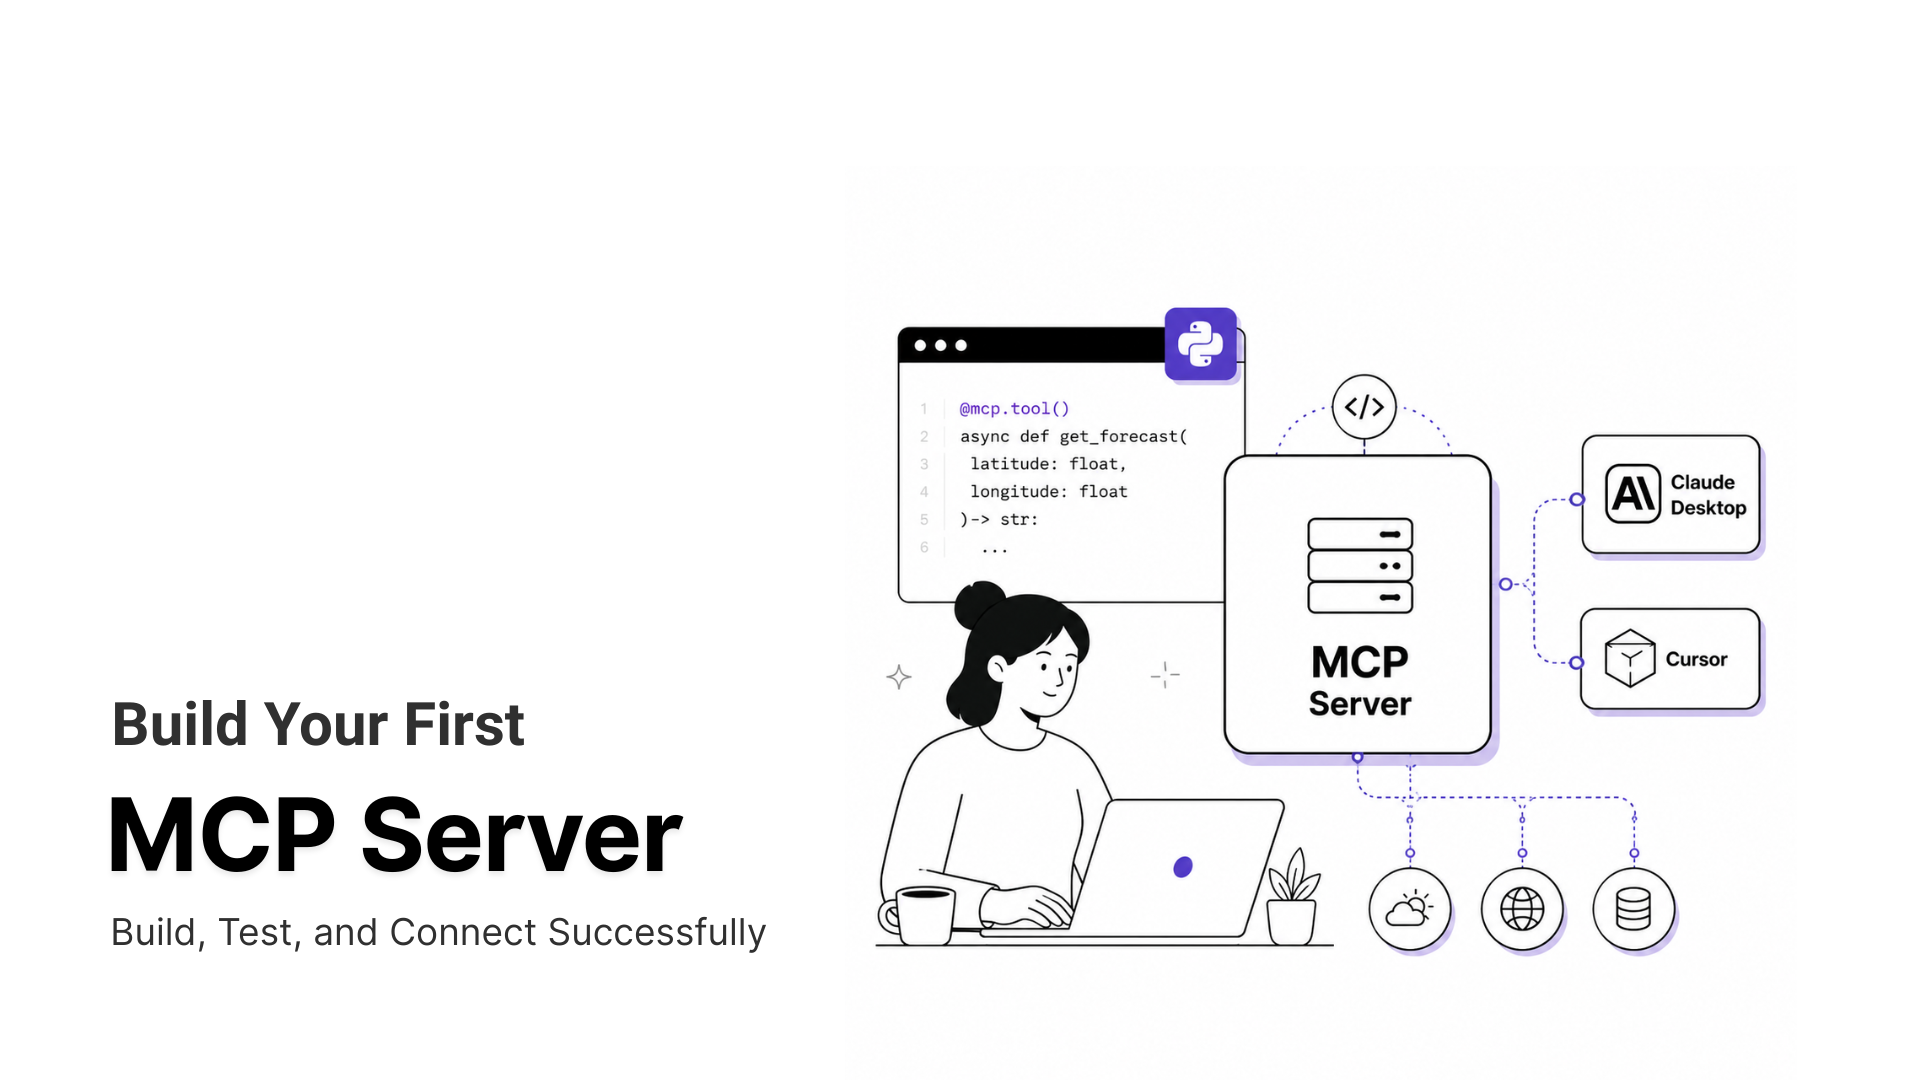
An MCP server is a program that speaks the JSON-RPC protocol defined by Model Context Protocol and offers up to three kinds of capability to a connected client.
- Tools Functions the model can call, with arguments the model fills in.
- Resources File-like data a client can read, such as a document or a database row.
- Prompts Pre-written templates that help a user start a specific task.
Tools do most of the work in a typical deployment. The server built in this tutorial focuses only on them. The client side of that exchange, the part that launches your server and calls its tools, follows a similar shape whether you’re using Claude Desktop, Cursor, or any other MCP-compatible host. On the wire this looks close to a REST API, though the differences matter once an agent starts chaining calls on its own.
How to Build an MCP Server
The rest of this guide builds one from scratch, a small weather server with a single tool, tested before it ever touches a real AI client.
What You Need Before You Start
A few things are needed before starting the Python build.
- Python 3.10 or higher.
- The uv package manager, or pip if you’d rather manage a virtual environment manually.
- A current version of the MCP Python SDK, pinned below 2.0 for this tutorial (more on why in Step 1). Check the installed version with
pip show mcprather than trusting a number from any tutorial, including this one. - Claude Desktop or Cursor installed, for testing the finished server against a real client.
If you’d rather build in TypeScript, Node.js 16 or higher and the @modelcontextprotocol/sdk package cover the equivalent setup. The steps below follow Python because it currently draws more search volume in this space, and the same logical sequence applies to both languages.
Step 1. Set Up the Project
Install uv if you don’t already have it, then scaffold the project.
curl -LsSf https://astral.sh/uv/install.sh | shuv init mcp-weathercd mcp-weatheruv venvsource .venv/bin/activate
uv add "mcp[cli]<2" httpxtouch weather.py
That version pin matters right now. The MCP Python SDK released v2.0.0 on July 28, 2026, and it renamed the FastMCP class you’re about to import to MCPServer and moved its module entirely. An unpinned uv add "mcp[cli]" today installs v2 and breaks the code in the next section with a ModuleNotFoundError. Pinning below 2.0 keeps this tutorial’s imports working. What actually changes for server authors on the newer SDK is worth reading once you’re ready to move off v1.
httpx handles the outbound HTTP calls your tool will make. The [cli] extra on the mcp package pulls in the command-line helpers you’ll use later to run and test the server.
Step 2. Write the Server and Its First Tool
Open weather.py and start with the imports and a FastMCP instance.
from typing import Anyimport httpxfrom mcp.server.fastmcp import FastMCPmcp = FastMCP("weather")NWS_API_BASE = "https://api.weather.gov"USER_AGENT = "weather-app/1.0"
FastMCP reads your function’s type hints and docstring to build the tool schema automatically. That’s what makes this approach faster than writing the JSON-RPC handlers by hand.
Add a helper function for the actual HTTP request.
async def make_nws_request(url: str) -> dict[str, Any] | None: """Make a request to the NWS API with proper error handling.""" headers = {"User-Agent": USER_AGENT, "Accept": "application/geo+json"} async with httpx.AsyncClient() as client: try: response = await client.get(url, headers=headers, timeout=30.0) response.raise_for_status() return response.json() except Exception: return None
Then register the tool itself with the @mcp.tool() decorator.
mcp.tool()async def get_forecast(latitude: float, longitude: float) -> str: """Get weather forecast for a location. Args: latitude: Latitude of the location longitude: Longitude of the location """ points_url = f"{NWS_API_BASE}/points/{latitude},{longitude}" points_data = await make_nws_request(points_url) if not points_data: return "Unable to fetch forecast data for this location." forecast_url = points_data["properties"]["forecast"] forecast_data = await make_nws_request(forecast_url) if not forecast_data: return "Unable to fetch detailed forecast." periods = forecast_data["properties"]["periods"] forecasts = [ f"{p['name']}: {p['temperature']}°{p['temperatureUnit']}, {p['detailedForecast']}" for p in periods[:5] ] return "\n---\n".join(forecasts)
This single tool proves the pattern. The docstring becomes the tool description the model reads. The type hints become the input schema. The official MCP docs walk through a second tool for weather alerts if you want to extend the example.
Step 3. Handle Logging Correctly
This is the step most tutorials skip, and it’s the cause of more broken stdio servers than any other mistake.
If your server uses stdio transport, anything written to stdout corrupts the JSON-RPC messages going back to the client. print() writes to stdout by default. Use print(..., file=sys.stderr) or a logging library configured to write to stderr instead.
import sys# Bad - corrupts the protocolprint("Processing request")# Good - safe for stdio serversprint("Processing request", file=sys.stderr)
HTTP-based servers don’t run into this, since logging doesn’t interfere with the HTTP response. Stdio is still the default transport for local servers connecting to Claude Desktop and Cursor, so treat this rule as non-negotiable.
Step 4. Run the Server
Add the entry point at the bottom of weather.py.
def main(): mcp.run(transport="stdio")if __name__ == "__main__": main()
Run the server from the terminal.
uv run weather.py
A process that starts and sits there without printing anything to stdout is behaving correctly. It’s listening for messages over stdio. A crash on startup is almost always a missing dependency or a syntax error rather than anything MCP-specific, so check the stack trace before assuming the protocol is at fault.
Step 5: Test Your MCP Server with MCP Inspector
Connecting straight to Claude Desktop or Cursor at this point means debugging two unknowns at once, your own server and the client’s handling of it. MCP Inspector removes that ambiguity by giving you a direct, browser-based window into what your server actually exposes.
Launch it against your server.
npx @modelcontextprotocol/inspector uv run weather.py
The Inspector starts a proxy on port 6277 and prints a session token to your terminal, then opens your browser to http://localhost:6274 with that token pre-filled in the URL. If it doesn’t open automatically, copy the printed URL yourself. Click Connect, open the Tools tab, and click List Tools.
Selecting get_forecast should show its schema in the panel. Fill in a latitude and longitude and click Run Tool to confirm a real forecast comes back instead of an error.
A missing tool here points to your server code. A tool that shows up in Inspector but not in your client points to the client configuration instead. Knowing which side is broken tells you exactly where to spend the next twenty minutes.
Step 6. Connect the Server to Claude Desktop
Open the Claude Desktop configuration file. On macOS this is ~/Library/Application Support/Claude/claude_desktop_config.json. On Windows it’s %AppData%\Claude\claude_desktop_config.json. Create the file if it doesn’t exist.
Add your server under the mcpServers key.
{ "mcpServers": { "weather": { "command": "uv", "args": [ "--directory", "/ABSOLUTE/PATH/TO/mcp-weather", "run", "weather.py" ] } }}
The path must be absolute, not relative. Get it by running pwd from inside the project directory. After saving, fully quit Claude Desktop instead of just closing the window, then reopen it. The weather server should now appear under the connectors icon. Confirm it’s working by asking Claude something like “what’s the weather in Sacramento?”
This stdio setup is the local path. Claude also supports MCP servers over web and through Claude Code, which follow a different connection flow than the desktop app.
Connecting to Cursor Instead
Cursor reads MCP config from .cursor/mcp.json for project-scoped servers or ~/.cursor/mcp.json for global ones. The structure is nearly identical to Claude Desktop’s.
{ "mcpServers": { "weather": { "command": "uv", "args": [ "--directory", "/ABSOLUTE/PATH/TO/mcp-weather", "run", "weather.py" ] } }}
One difference is Cursor’s tool budget. Cursor caps active tools at roughly 40 across all connected servers. Past that ceiling, the agent silently stops seeing some tools rather than throwing a visible error. If you’re connecting several servers, keep each one scoped to 5 to 10 well-defined tools rather than building one server that tries to do everything.
Managing several MCP servers across multiple AI clients gets tedious fast, a separate config block, command path, and environment variable set for every server you maintain. MCP360 replaces all of that with one endpoint and one credential. Whether that trade is worth it instead of maintaining every server yourself usually comes down to hosting costs and ongoing maintenance time.
MCP Server Security Best Practices
Security in MCP isn’t a hardening pass bolted on later, it’s decisions made inside the tool function itself. Endor Labs found 82 percent of 2,614 MCP implementations use file operations prone to path traversal, and a 2025-2026 Equixly assessment found 43 percent of tested servers vulnerable to command injection. Both trace back to the same root cause, unvalidated input reaching a file path, shell command, or query. The OWASP MCP Security Cheat Sheet and Anthropic’s own guidance reduce the fix to a handful of rules.
- Validate every input’s type, range, and format at the top of the tool function, and reject on the first failure.
- Scope credentials to exactly what the tool needs. A weather server has no reason to hold credentials beyond the weather API it calls.
- Never pass a token straight through to a downstream API without validating its audience and scope first. This is token passthrough, and it breaks MCP’s trust boundary.
- Require explicit user confirmation for any tool that writes data, deletes data, or triggers a side effect.
- On stdio transport, log to stderr only, and scope file system access to what the tool actually needs.
Plan for OAuth 2.1 authorization on any server beyond a read-only demo. Credential audits of more than 5,200 public MCP servers found 53 percent still rely on static API keys, with only 8.5 percent using OAuth. Teams shipping into regulated environments typically layer additional hardening tied to newer spec revisions and NSA and CISA guidance on top.
Common MCP Server Mistakes
A few failure patterns show up often enough to call out directly, beyond the stdout logging issue from Step 3.
The server works when you run it manually but fails when the AI client launches it. This is almost always an environment mismatch. Your terminal knows where uv, node, or python live because your shell loads .zshrc or .bashrc. A desktop client often doesn’t inherit that environment. Run which uv and use the full path in your config if a relative command name isn’t resolving.
The config file has a trailing comma or other small JSON error, and the client fails to load any of it without telling you why. Run the file through a JSON validator before assuming the problem is in your server code.
The server connects but no tools show up. Test it in MCP Inspector first, as covered in Step 5. Tools that appear there but not in your client point to a client-side configuration problem. Connection failures generally split into three layers, server registration, client configuration, and environment mismatches, and diagnosing which one is failing first is the fastest path to a fix.
Frequently Asked Questions
What is an MCP server?
An MCP server is a program that exposes tools, resources, or prompts to an AI model through the Model Context Protocol. Instead of manually pasting context into a chat, the AI calls a tool, the server runs the underlying logic such as an API request or file lookup, and returns a structured result the model can use directly.
What’s the difference between an MCP server and an MCP client?
An MCP client lives inside the AI host, such as Claude Desktop or Cursor, and asks a connected server what tools are available before calling them on the model’s behalf. An MCP server does the opposite job. It exposes those tools, resources, or prompts and executes the actual logic when a request arrives. Most applications need both pieces working together to function.
Why does my MCP server fail with ModuleNotFoundError: No module named mcp.server.fastmcp?
This started happening because the MCP Python SDK released v2.0.0 on July 28, 2026, and removed the mcp.server.fastmcp module entirely, renaming the FastMCP class to MCPServer. An unpinned pip install mcp or uv add mcp[cli] now resolves to v2 by default. Pin the dependency to mcp[cli]<2 to keep existing FastMCP imports working, or migrate the import to mcp.server.MCPServer.
Why does my MCP server work in the terminal but not in Claude Desktop?
The usual cause is an environment mismatch, not a bug in your code. Your terminal loads shell configuration files that define commands like uv, node, or python, while Claude Desktop often does not inherit that same environment when it launches your server. Run which uv in your terminal and use the full path it returns in your config instead of the bare command name.
What port does MCP Inspector run on?
MCP Inspector opens its web interface at http://localhost:6274 by default and runs a separate proxy process on port 6277 to communicate with your local server. Launching it prints a session token to your terminal and normally opens your browser with that token pre-filled in the URL. If the browser doesn’t open automatically, copy the printed URL and paste it in yourself.
How many tools can I connect to Cursor before it stops working?
Cursor caps active tools at roughly 40 across every connected MCP server combined. Past that ceiling, the agent silently stops seeing some tools instead of showing an error, which makes the failure easy to miss. Keep each server scoped to 5 to 10 well-defined tools, or run several servers through MCP360’s single gateway so one connection replaces a stack of individual limits.
Should I use stdio or Streamable HTTP for my MCP server?
Use stdio for local development or when a single client launches and owns your server directly, since it has no network exposure and every major MCP client supports it. Choose Streamable HTTP when multiple users or machines need shared access to the same running server. For a first Python server connecting to Claude Desktop or Cursor, stdio is almost always the simpler starting point.
What’s the most common MCP server security mistake?
Passing model-supplied input straight into a file path, shell command, or query without validating it first. Independent research on thousands of public MCP implementations found the large majority use file operations prone to path traversal, and a meaningful share are vulnerable to command injection. Treat every argument a tool receives as untrusted, validate types and ranges at the top of the function, and reject on the first failure.
Do I need to build my own MCP server, or can I use an existing one?
Build your own when you need custom logic or a connection to an internal system nothing else already covers. Use an existing server, or MCP360, which packages 100+ ready-made tools behind one integration, when you mainly need access to services that already have solid implementations. MCP360’s Custom MCP Builder also turns an existing REST API into a working MCP server without writing one from scratch.
How do I connect the same MCP server to both Claude Desktop and Cursor?
Add the same command and args block to both config files, Claude Desktop’s claude_desktop_config.json and Cursor’s .cursor/mcp.json, using the same absolute path to your project. Each client manages its own connection, so the server needs to be added separately in both places. Once several servers are running across multiple clients, MCP360 replaces those duplicate config blocks with one shared connection and credential.
Conclusion
Once this server runs cleanly, the same pattern scales to anything else worth exposing to an agent, an internal API, a database, a third-party service you already have credentials for. The protocol stays the same. Only the tool function changes.
If you want a sense of what’s worth building next, a rundown of the MCP servers worth knowing in 2026 is a good place to look before you start your second one.
Writing that server code yourself isn’t required for every use case. MCP360’s Custom MCP Builder turns an existing API into a working MCP server without hand-written server code, while still applying the same scoping and validation principles covered above.
Tags

Article by
RajniAI & Tech | Senior Content Writer
Rajni is a senior content writer covering AI agents, automation, and no-code tools. She writes across the AI space, from chatbots and customer support to MCP and agent workflows, focused on how businesses actually put these tools to work.