


The TL;DR
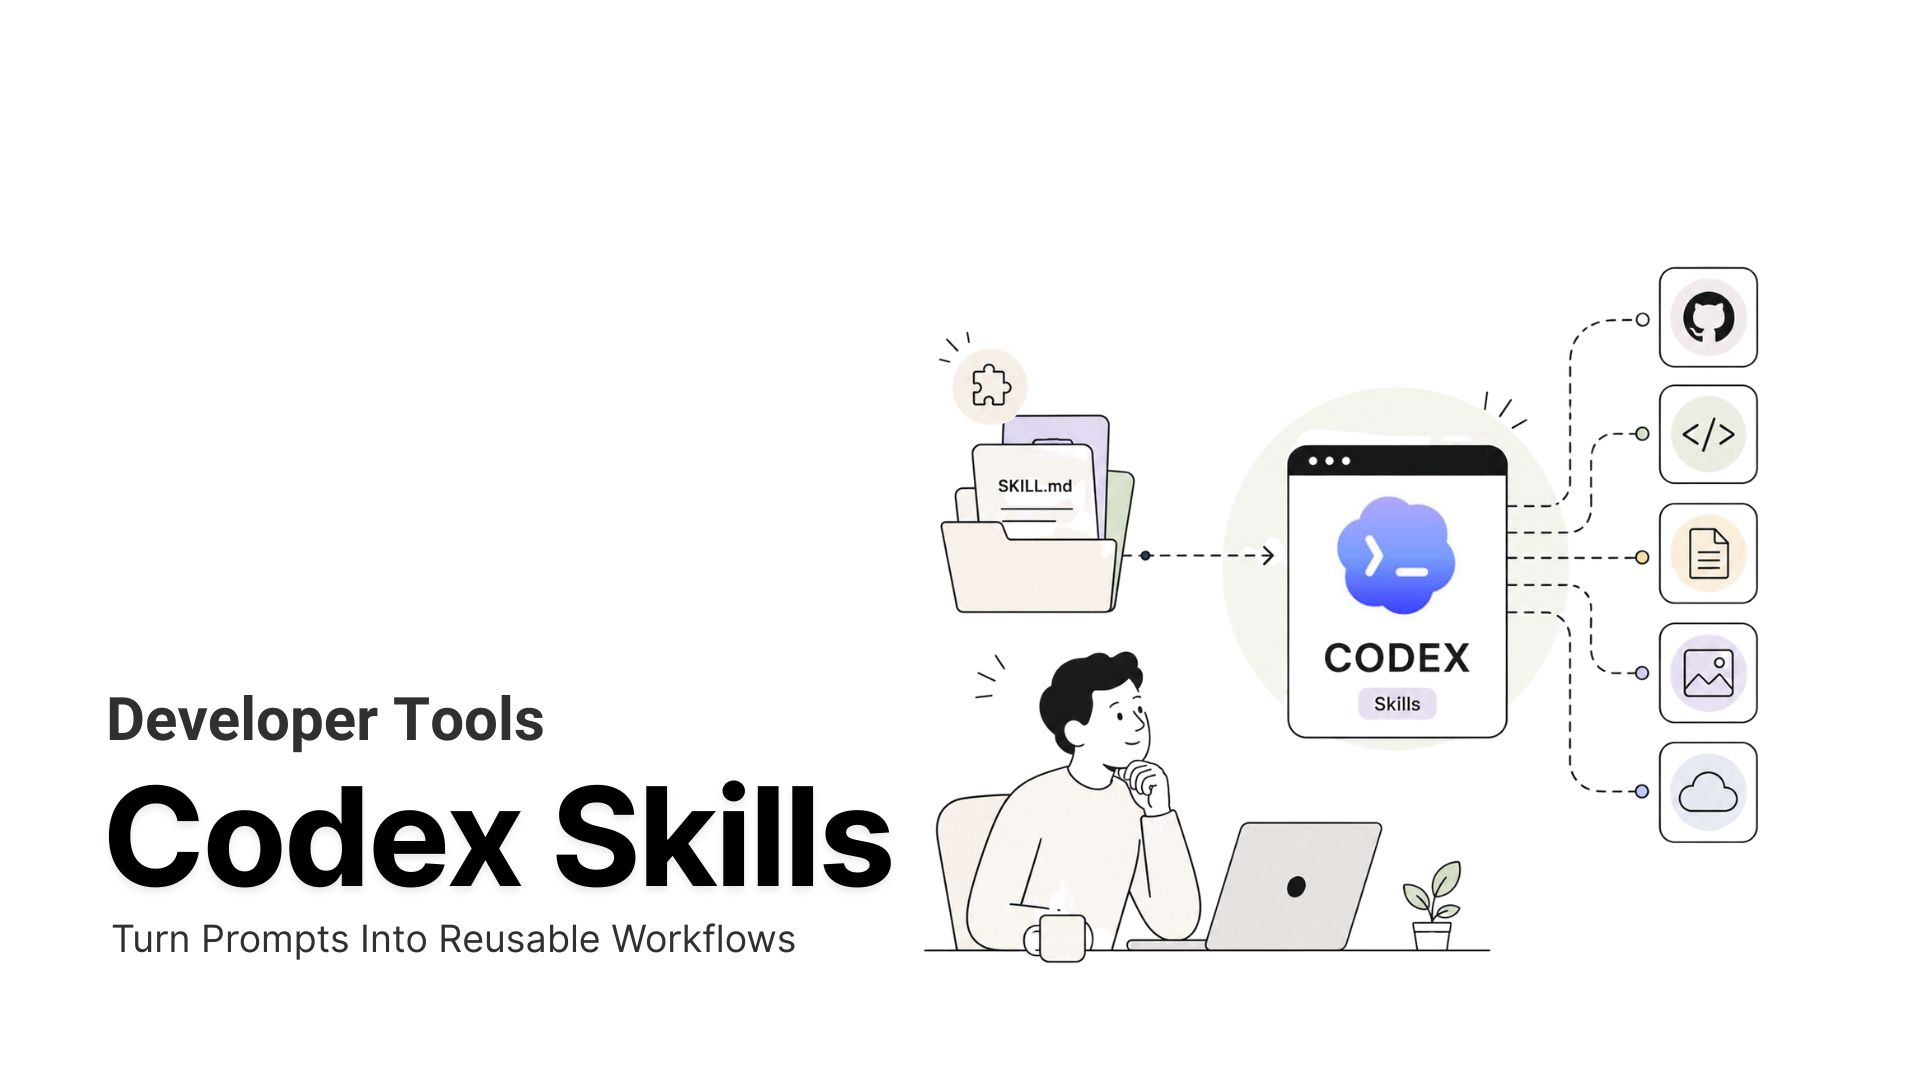
Codex skills package repeatable workflows into reusable folders, allowing Codex to apply the same instructions, scripts, references, and assets across future sessions without requiring you to rewrite them.
-
• What Codex Skills Are
A skill is a directory containing a
SKILL.mdfile and optional scripts, references, and assets. Codex loads the full skill only when the current task requires it. -
• Why They Matter
Skills use progressive disclosure, so you can add dozens of them without filling every session with unnecessary context. OpenAI’s engineering team has also credited repository-specific skills with improving pull request throughput.
-
• What This Guide Covers
This guide explains which official and community skills are worth installing first, how to install them, and what to review before trusting a skill you did not create yourself.
Codex can write good code quickly, but a new session often means starting from zero. The conventions, shortcuts, and workarounds you explained earlier are gone, so the same instructions have to be repeated again.
Codex skills solve that problem. A skill packages a repeatable workflow into a reusable set of instructions that Codex can load automatically when a task matches its purpose, or run directly when you call it by name.
Since OpenAI introduced skills in December 2025, the ecosystem has grown into two main layers: an official catalog maintained by OpenAI and a broader collection of community-built skills from independent developers.
Neither is always the better choice. Official skills are usually narrower, tested, and easier to trust. Community skills often cover more ambitious workflows, but they can vary widely in quality, maintenance, and security.
The goal is not to install as many skills as possible. It is to choose a small set that removes work you repeatedly explain, while checking exactly what each skill can access and execute before you rely on it.
What Are Codex Skills
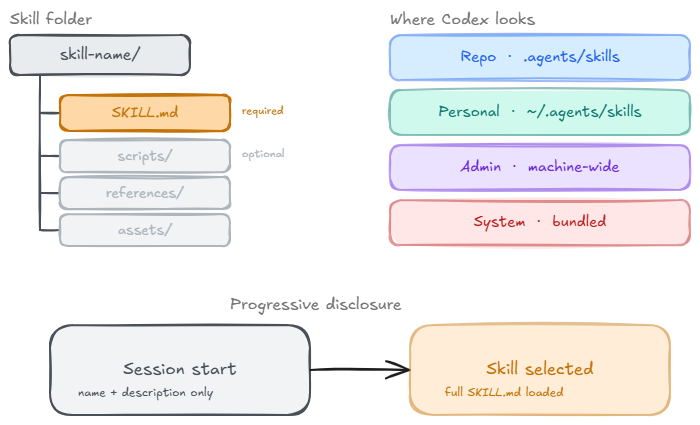
A Codex skill is a directory containing a required SKILL.md file, plus optional scripts/, references/, and assets/ folders. The SKILL.md file needs just two fields in its frontmatter, a name and a description. Everything else, the actual instructions Codex follows once it picks the skill, lives in the body of the file.
Codex doesn’t load every installed skill’s full instructions up front. It uses what OpenAI calls progressive disclosure. At the start of a session, Codex only sees each skill’s name, description, and file path, capped at roughly 2 percent of the model’s context window, or 8,000 characters when the window size is unknown. Only once Codex decides to actually use a skill does it read the full SKILL.md. That mechanism is what lets a Codex setup carry dozens of skills without any of them crowding out the real prompt.
Skills work the same way across the Codex CLI, the IDE extension, and the Codex app. Codex reads them from four kinds of locations.
- Repository folders (
.agents/skills), checked into a project so a team shares them - A personal folder (
~/.agents/skills), available in every project a person touches - Admin-level machine folders, set up for everyone on a shared system
- A small system set that ships bundled with Codex itself
Skills vs Plugins vs MCP
The three terms get used loosely, and they mean different things.
A skill is the authoring format, a folder of instructions built for one specific job. A plugin is the installable distribution unit. It can bundle one or more skills together, plus MCP server configuration and app-facing metadata, so someone else can install everything in a single step instead of hunting down each skill separately. The usual order is to build the workflow as a skill first, then package it as a plugin once other developers need it too.
MCP, the Model Context Protocol, solves a different problem. A skill teaches Codex how to do something. MCP gives Codex something new to reach, a live external service like Figma, Notion, or Linear, connected over a real network transport rather than a folder of markdown. Several official skills, including the Figma family, actually combine both, the skill supplies the workflow, MCP supplies the live connection to the design file.
| Aspect | Skill | Plugin | MCP |
|---|---|---|---|
| What it is | The authoring format: a folder of instructions built for one job | The installable distribution unit | The protocol that connects Codex to a live external service |
| What it solves | Teaches Codex how to complete a specific task or workflow | Bundles one or more skills into a single-step installation | Gives Codex access to external tools, data, and services over a network |
| Lives as | A folder containing a SKILL.md file |
A package containing skills, MCP configuration, and app metadata | A live server connection rather than a file stored on disk |
| Example from this guide | Any individual skill included in the recommendations | A group of skills packaged together for easier distribution | The Figma skills, which combine workflow instructions with a live MCP connection |
That distinction matters once a task stops being about following steps and starts being about reaching a pile of outside services at once. Wiring up a separate MCP connection for every tool an agent might need gets old fast, which is the exact problem gateways like MCP360 exist to solve, a single connection standing in for dozens of individual server setups. For a closer look at how CLI-based tools like Codex and MCP-based tool access actually differ, MCP vs CLI walks through the tradeoffs in more depth, and 10 Essential MCP Servers for 2026 is a reasonable next stop once a skill’s job outgrows what it can do alone.
How Codex Decides Which Skill To Use
Codex activates a skill in one of two ways. Explicit invocation is naming the skill directly, browsing with /skills, or calling one mid-prompt with $skill-name. Implicit invocation is Codex matching the task against every installed skill’s description on its own and picking the closest fit, without anyone naming anything.
Most of the failure cases show up on the implicit path. A description that’s too vague matches nothing. One that’s too broad fires on tasks it was never meant for. When a lot of skills are installed, Codex also truncates descriptions before matching, so a trigger phrase buried mid-paragraph gets cut before it’s ever read. That’s why OpenAI’s own guidance is to front-load the actual trigger words and use case in the first line of a description.
The Best Codex Skills To Install Right Now
These are the skills that earn a permanent spot in a Codex setup, chosen for everyday coding work rather than novelty. Each one closes a specific gap in how Codex handles context, planning, or repetitive tasks.
| Skill | Type | Best For |
|---|---|---|
| MCP360 | Third-party skill file | Reaching 100+ external tools without building and maintaining a separate MCP server |
| Superpowers | Community, Jesse Vincent | Enforcing a structured plan-then-code development workflow |
skill-creator |
Official, built-in | Turning a repeated prompt or workflow into a reusable Codex skill |
imagegen |
Official, built-in | Creating quick icons, banners, UI assets, and placeholder artwork |
doc, pdf, spreadsheet |
Official, curated | Producing office-style documents with preserved formatting, layouts, and formulas |
gh-fix-ci |
Official, curated | Diagnosing and proposing fixes for failing GitHub Actions checks |
gh-address-comments |
Official, curated | Responding to pull request feedback and applying requested changes |
frontend-skill |
Official, curated | Building polished web interfaces that avoid generic AI-generated design patterns |
cli-creator |
Official, curated | Turning repeated commands and scripts into a reusable command-line tool |
cloudflare-deploy |
Official, curated | Deploying a web application directly to Cloudflare Workers or Pages |
develop-web-game |
Official, curated | Building, testing, and refining a browser game through an iterative workflow |
1. MCP360
MCP360 ships a ready-to-use .md skill file built for exactly this format, and dropping it into Codex works the same way as any other skill, with no separate MCP server to stand up first. Behind that one file sits a single gateway spanning eight tool categories, search and web, SEO and marketing intelligence, e-commerce and app stores, media, maps and travel, domain and network lookups, finance, and productivity and verification. A Codex session that needs a weather lookup, a keyword-volume check, and a currency conversion in the same task can reach all three through the one connection instead of three separate integrations. The API key and endpoint live inside the skill file itself, so nothing about the day-to-day workflow changes once it’s installed.
Pros
- One integration, dozens of tools: Replaces wiring up a separate MCP connection for every service with a single skill file and API key
- Doesn’t bloat context: The
search_toolsandexecute_toolmeta-tools load a server’s tools on demand, the same on-demand principle behind Codex’s own progressive disclosure - Custom MCP Builder included: Wrap an existing REST API or run your own Python or JS logic when a specific tool isn’t already in the catalog, no separate hosting required
- Automatic failover: Keeps a workflow running when an individual upstream API changes or breaks, instead of one bad dependency stalling a whole task
- Free tier available: Enough to test the skill file against a real workflow before committing to anything paid
Cons
- Third-party dependency: It’s a hosted gateway rather than a local skill, so it needs an API key and a working connection instead of running entirely offline
- Broad by design: A setup that only ever needs one or two specific tools may get more catalog than it actually needs
Best For
Any Codex workflow that needs to reach more than a couple of outside services, search, SEO data, e-commerce lookups, maps, without writing and maintaining a separate MCP server for each one.
Setup:
Download the task-specific .md skill file from mcp360.ai, then place it the same way any Codex skill goes in
mkdir -p ~/.codex/skills/mcp360-<task> && mv <downloaded-file>.md ~/.codex/skills/mcp360-<task>/SKILL.md
2. Superpowers (Jesse Vincent)
Superpowers is an open-source, MIT-licensed development methodology built by Jesse Vincent, published under the GitHub handle obra, and it has grown into one of the most-starred projects in the coding-agent space, sitting at over 243,000 GitHub stars as of July 2026. It was built first for Claude Code, but the same skill files now ship as an installable plugin for Codex CLI and the Codex App too, alongside Cursor, Gemini CLI, OpenCode, and several other agents. Rather than one narrow job, it bundles fourteen composable skills covering brainstorming, spec writing, planning, subagent-driven implementation, test-driven development, and code review, with a startup hook that routes each task to whichever skill actually applies without anyone naming one directly. The result reads less like a single skill and more like an entire engineering process encoded as markdown.
Pros
- Forces a real sequence: Brainstorm, then a written plan, then test-driven implementation, before any code gets written
- Enforces TDD by default: A failing test has to exist before implementation starts, not left as an optional habit
- Uses fresh subagents per task: Each step of a plan runs in its own context, then gets reviewed by a separate agent before the next step starts
- Travels across agents: The same fourteen skills apply whether a team runs Codex, Claude Code, or a mix of both, without switching methodologies per tool
- Actively maintained: Frequent releases and a large contributor base mean rough edges get found and fixed fast
Cons
- Heavier than a single skill: The enforced brainstorm and plan steps add real overhead on small or trivial changes
- Separate install per agent: In the Codex app, install it from Plugins in the sidebar. In Codex CLI, type
/pluginsand search for superpowers
Best For
Teams that want Codex to slow down and plan on ambiguous or large features. Skip it for quick, well-understood fixes.
Setup:
In Codex CLI, run /plugins and search superpowers. In the Codex app, open Plugins in the sidebar and search the same way.
3. Skill Creator
Skill Creator is one of the handful of skills that ships with Codex itself, so typing $skill-creator, or simply telling Codex a repeated workflow deserves its own skill, starts a short interview right away. Codex asks what the skill actually does, when it should trigger, and whether the job needs bundled scripts or can stay instruction-only, which is the default unless a script gets explicitly requested. The output is a properly formatted SKILL.md file with working frontmatter, saved to the right location automatically, rather than a person hand-writing the format and guessing. It turns the habit of re-explaining a workflow into a one-time setup step instead.
Pros
- No separate install: Ships as one of Codex’s built-in system skills, ready from the first session
- Handles the format for you: Outputs valid SKILL.md frontmatter without needing to learn the spec by hand
- Asks the right questions: Specifically probes for trigger phrases and scope, the two things that decide whether implicit invocation works later
- Defaults to the simpler option: Instruction-only unless a script is actually needed, keeping new skills lightweight
- Works from a plain description: No need to already know the SKILL.md format, natural language is enough to start
Cons
- Still needs testing: A skill it helps create still needs testing against real prompts, since a description that reads fine to a person can be too vague or too broad for implicit matching to work well
Best For
Anyone who has explained the same workflow to Codex more than twice. That repetition is the signal it’s worth turning into a skill instead of a habit.
Setup:
None needed, it ships with Codex by default. Type $skill-creator to use it right away.
4. Image Generation (imagegen)
Image Generation, also called imagegen, is bundled with Codex by default and works identically across the CLI, the IDE extension, and the Codex app. It generates and edits images using OpenAI’s gpt-image-2 model, either through a plain-language request or by invoking it directly with $imagegen. Attaching a reference image gives it something to extend or restyle, instead of generating from a blank prompt, which matters for anything that needs to match an established visual style. It fits naturally into the same session as the rest of a coding task, producing an icon, banner, or piece of placeholder art without switching to a separate design tool.
Pros
- No extra setup: it counts toward existing Codex usage limits instead of requiring its own account for typical use
- Reference-aware: can restyle or extend an attached image instead of generating blind
- Same interface everywhere: works identically in the CLI, IDE extension, and Codex app
- Fast for small assets: an icon or banner comes back in the same turn as the rest of a task
- Explicit or automatic: triggers from plain language or gets called directly with
$imagegen, whichever fits the workflow
Cons
- Burns quota fast: Built-in image generation uses included limits 3 to 5 times faster than an ordinary turn, depending on image quality and size
- Not built for batches: For heavier batches, OpenAI’s own docs point toward setting an API key and generating through the API instead, where separate pricing applies
Best For
A handful of UI assets or placeholder art without leaving the terminal. Move to the API route once a task needs more than a few images.
Setup:
None needed, it ships with Codex by default. Call it directly with $imagegen or describe the image in plain language.
5. Document Skills (doc, pdf, spreadsheet)
Document Skills is really three separate official curated skills, doc, pdf, and spreadsheet, each scoped to one file format rather than trying to cover all office work with a single generic skill. All three read, create, and edit files while keeping the actual formatting intact, so a Word document keeps its styles and a spreadsheet keeps its formulas instead of everything getting flattened to plain text along the way. They ship as part of the same curated catalog as the GitHub and deployment skills, installed through the standard skill-installer command. Because each skill is scoped narrowly, Codex can pick the right one automatically based on the file type in front of it, rather than one broad skill trying to guess how to handle three different formats.
Pros
- doc keeps structure: Preserves actual Word formatting on edits instead of losing it on a round trip
- pdf keeps layout: Maintains layout integrity when reading or generating a document
- spreadsheet handles formulas: Keeps formulas and cell structure intact rather than reducing everything to raw values
- Scoped by format: Each skill activates for the file type it’s built for, rather than one skill guessing across formats
- Installed like any other curated skill: Same skill-installer flow as the rest of the official catalog, no separate setup
Cons
- Edge cases need a check: Merged cells, footnotes, and tracked changes are still worth a manual look before a document goes out the door
- Three skills to keep in sync: Since doc, pdf, and spreadsheet update independently, a fix or improvement to one doesn’t automatically carry over to the others
Best For
Teams that hand Codex office-style deliverables, client reports, structured PDFs, or spreadsheets that need real formulas rather than static numbers.
Setup:
$skill-installer doc, $skill-installer pdf, or $skill-installer spreadsheet, one command per format needed.
6. GitHub CI Fix (gh-fix-ci)
A pull request sitting on a red check is the exact problem GitHub CI Fix, or gh-fix-ci, is built to handle. Once Codex notices a failing GitHub Actions run, it pulls the actual check output through the gh CLI, summarizes what broke in plain terms, and proposes a fix based on that output rather than guessing from the PR diff. It’s one of the skills OpenAI’s own engineering team has used internally, alongside repo-local AGENTS.md files and GitHub Actions, to turn CI triage into a repeatable step instead of a manual log-reading exercise. The skill needs an already-configured gh CLI to read check results and open a follow-up commit or comment, and it’s built to sit early in a review cycle, catching build breaks before a human reviewer has to look at the PR at all.
Pros
- Skips the manual log dive: Reads the failing check output directly instead of a person clicking through logs
- Pairs well with review work: Fits naturally alongside gh-address-comments for a full loop, fix CI first, then work through reviewer comments
- Backed by real numbers: OpenAI’s own Agents SDK repos report merged pull requests rising from 316 over three months to 457 over the following three months after adding repo-local skills like this one alongside GitHub Actions
- Works from the actual failure: Proposes fixes grounded in the real check output, more reliable than guessing from the diff
- Fits into an existing review cycle: Catches build breaks before a human reviewer needs to look at the PR
Cons
- Needs
ghconfigured: The CLI has to be authenticated locally or in CI, and a genuinely broken build still needs a human to decide on the right fix, since a proposed one isn’t enough on its own - Doesn’t replace root-cause work: It triages the failing check, but a flaky test or infrastructure issue still needs someone to dig deeper
Best For
Any repository where CI failures are frequent enough that a first-pass diagnosis saves real reviewer time.
Setup:
$skill-installer gh-fix-ci
7. Address GitHub Comments (gh-address-comments)
Where gh-fix-ci handles a broken build, Address GitHub Comments, or gh-address-comments, handles the review that follows it, the two are meant to be used as a pair. It reads review or issue comments on the open pull request for the current branch directly through the gh CLI, rather than requiring someone to copy feedback text into the chat by hand. Codex works through each comment, makes the corresponding change, and keeps the resulting commits traceable back to the specific piece of feedback that prompted them. That combination fits any repository where review cycles run through several rounds of back-and-forth rather than a single approval.
Pros
- Works from the live PR: No manual transcription of comments into the prompt
- Finds comments automatically: No separate step to specify which feedback to address
- Edits land in place: Fixes go straight into the branch under review, not a separate follow-up PR
- Keeps scope tight: Touches only what a comment actually asked for, rather than opening up unrelated changes while already in the file
- Reduces repeat follow-up: Addressing feedback directly cuts down on reviewers re-flagging the same note in a second pass
Cons
- Same CLI requirement: It needs the same
ghauthentication as gh-fix-ci, and vague review comments still need a human to clarify intent before Codex can act on them well - Comment quality still matters: A one-word note like “fix this” gives Codex little to act on without a follow-up question
Best For
Contributors managing active PR review cycles with frequent reviewer back and forth.
Setup:
$skill-installer gh-address-comments
8. Frontend Skill
The developer community has started calling it the AI-slop look, the same handful of layouts, fonts, and color palettes coding agents default to without design guidance, and Frontend Skill exists specifically to counter it. It encodes actual design judgment into the instructions Codex follows, spacing, typography choices, and color decisions, rather than relying on a generic component library and calling it done. It ships as part of the official catalog, installed through the same skill-installer flow as the rest of the collection. Unlike a general-purpose coding skill, it stays scoped to frontend and UI work, the kind of task where a design decision matters as much as a working feature.
Pros
- Handles both directions: Works the same way whether Codex is starting a page from scratch or reworking one that already shipped
- Triggers automatically: Activates once a task reads as frontend or UI work, no need to invoke it by name
- Keeps design decisions in one place: The judgment calls live inside the skill instead of being re-explained in an ad hoc prompt each time
- Targets a named, specific problem: Built to counter the AI-slop look directly rather than offering generic design tips
- Consistent across a project: The same instructions apply whether it’s the first page Codex builds or the tenth, so a project doesn’t drift visually page by page
Cons
- Output tracks prompt detail: Quality still depends heavily on how specific the prompt is about brand, audience, and any existing design system already in place
- Not a substitute for brand guidelines: It improves default output, but a team with strict brand standards still has to feed those specifics into the prompt
Best For
Solo developers and small teams shipping a landing page, prototype, or internal tool without a designer on hand.
Setup:
$skill-installer frontend-skill
9. CLI Creator (cli-creator)
Turning a sequence of commands, scripts, or API calls someone keeps running by hand into a proper, reusable command-line tool is the whole job of CLI Creator, or cli-creator. Rather than saving a prompt that recreates the steps each time, it produces an actual executable with stable JSON output, health checks, and support for running from any directory on the PATH. It also builds a companion skill alongside the tool itself, one that teaches future Codex sessions how to call the CLI it just created, so the next session doesn’t need a fresh explanation. That handoff is what separates it from simply scripting something once, the tool becomes part of a reusable toolkit going forward, discoverable and callable the same way any other CLI tool would be.
Pros
- Produces a real tool: The output is a path-executable CLI with stable JSON output and health checks, not a saved prompt pretending to be a tool
- Self-documenting handoff: The next session already knows how to use what got built, without a fresh explanation
- Runs from anywhere: Works from any directory once it’s on the PATH, not tied to one project folder
- Stable, structured output: JSON output and health checks make it usable in automated scripts and pipelines, a step beyond most interactive-only skills
- Builds the documentation as it builds the tool: The companion skill is generated at the same time, no separate write-up step
Cons
- Overkill for one-offs: It’s scoped specifically to durable, reusable tooling, and a script that only needs to run once doesn’t need this much structure
- Adds a maintenance surface: A generated CLI is still a piece of software someone has to keep working as the underlying commands change
Best For
Backend and infrastructure work where the same command sequence runs often enough to justify becoming a real tool.
Setup:
$skill-installer cli-creator
10. Cloudflare Deploy (cloudflare-deploy)
Getting a working local build onto a live URL is what Cloudflare Deploy, or cloudflare-deploy, handles, shipping straight to Cloudflare Workers and Pages from inside a Codex session without switching to a separate terminal or dashboard. OpenAI’s own announcement of the Codex app lists Cloudflare alongside Netlify, Render, and Vercel as one of the cloud hosts Codex can deploy to directly once a build is ready, so this fits into a workflow OpenAI itself has documented rather than a third-party integration bolted on afterward. It handles the deployment step specifically, building on whatever framework or static-site setup already exists in the project rather than dictating a particular stack. It’s one of several deploy-target skills in the official catalog, alongside a Netlify equivalent, for teams that host somewhere else.
Pros
- Closes the loop: Takes a project from a working local build to a live URL without a separate manual deploy step
- Matches a common stack: Fits naturally with projects already built using the frontend-skill or a Cloudflare-hosted backend
- Documented by OpenAI directly: Named specifically in OpenAI’s own Codex app announcement as a supported deploy target
- Framework-agnostic: Builds on whatever stack already exists in the project rather than requiring a particular setup
- Same session, no context switch: Deployment happens without leaving Codex for a separate terminal or dashboard
Cons
- Assumes an existing Cloudflare setup: An account and any required tokens still need to be in place before the skill can push a deploy
- Locked to one provider: Teams that split hosting across Cloudflare and somewhere else still need the separate Netlify skill or a manual step for the rest
Best For
Shipping a prototype, landing page, or small app to a live URL the same session it gets built, without leaving Codex to run deploy commands by hand.
Setup:
$skill-installer cloudflare-deploy
11. Web Game Development (develop-web-game)
Building and testing a browser game iteratively is the job of Web Game Development, or develop-web-game, which uses Playwright to actually play the game back rather than just checking that the code compiles. OpenAI’s own team used this skill, paired with the image generation skill, to build a full racing game with multiple racers, eight maps, and item pickups, working independently across more than 7 million tokens according to OpenAI’s own announcement of the feature. The Playwright integration means Codex can click, move, and interact with the running game much like a person testing it would, then judge whether a new feature actually behaves as intended before moving to the next one. That loop, build a feature, play-test it, fix what’s wrong, repeat, is built into the skill rather than left to a person to run manually after each change.
Pros
- Tests by playing, beyond a passing compile: Uses Playwright to interact with the running game and confirm a feature actually works before moving on
- Pairs naturally with imagegen: Sprites, icons, and game art can come from the same session without switching tools
- Backed by a real example: OpenAI’s own team used it to build a full racing game across more than 7 million tokens, working independently
- Iterative by design: The build, play-test, fix loop happens automatically rather than needing a person to run it manually each time
- Interacts like a real player: Playwright clicks, moves, and reacts to the running game rather than just reading source code
Cons
- Best suited to browser-based games: The iterative play-test loop is built around a web game running in a browser, not a native or console target
- Playwright adds overhead: Spinning up a browser to test each iteration is slower than a plain compile check, noticeable on larger games
Best For
Prototyping a browser game or an interactive demo where “does it actually play right” matters more than a passing build.
Setup:
$skill-installer develop-web-game
12. Excalidraw
Turning a text description into an actual diagram, then checking whether it rendered correctly, is what the Excalidraw skill from yctimlin’s mcp_excalidraw project handles, and it’s grown to over 2,000 GitHub stars as of July 2026. The repository bundles two pieces, an MCP server with 26 tools for element-level control and a companion Codex CLI-compatible skill that wraps the same workflow into step-by-step guidance plus helper scripts for exporting, importing, and health-checking the canvas. Unlike a one-shot prompt-to-diagram generator, it keeps a persistent, editable scene that Codex can inspect through a screenshot or a structured description before making the next change, then align, group, or export it once it’s right. When the MCP server isn’t configured, the skill falls back to calling the same canvas over a REST API directly, so the workflow keeps going even without a live MCP connection.
Pros
- Sees what it draws:
describe_sceneand a canvas screenshot let Codex check its own output before calling the diagram finished - Full element control: Create, update, delete, align, group, and duplicate individual elements instead of regenerating the whole diagram for one change
- Works without a live MCP connection: The bundled skill falls back to REST calls if the MCP server isn’t running
- Exports to real files: Produces actual
.excalidrawJSON that opens natively in Excalidraw, plus shareable encrypted links, not a static image - Converts existing Mermaid diagrams: A dedicated tool turns Mermaid syntax into an editable Excalidraw scene instead of starting over by hand
Cons
- Two moving parts: The canvas server and MCP server run as separate processes, and the canvas has to be running before the MCP server can connect
- In-memory by default: Canvas stores elements in memory, so restarting the server clears the scene unless it’s already been exported
Best For
Anyone who wants Codex to produce real, editable architecture diagrams, flowcharts, or system maps, and to actually check its own output, rather than a static image pasted into a doc.
Setup:
git clone https://github.com/yctimlin/mcp_excalidraw.git && mkdir -p ~/.codex/skills && cp -R mcp_excalidraw/skills/excalidraw-skill ~/.codex/skills/excalidraw-skill
How To Install A Codex Skill
Installing an official curated skill takes one line inside Codex.
$skill-installer gh-fix-ci
That command pulls from OpenAI’s own catalog at github.com/openai/skills/tree/main/skills/.curated by default. Skills in the .system tier, like skill-creator and imagegen, are already preinstalled and don’t need this step.
For a community skill hosted elsewhere on GitHub, give skill-installer the repository and the exact path, or the full tree URL.
$skill-installer install https://github.com/<owner>>/<repo>>/tree/<ref>>/<path>>
Skills can also go in by hand. Clone or copy the skill folder into a location Codex already scans, most often ~/.codex/skills for a personal skill available in every project, or .agents/skills inside a repository for a project-only skill checked into version control alongside the code.
Codex usually detects a new skill on its own. If it doesn’t show up in /skills right away, restart the session.
To turn a skill off without deleting it, add an entry to config.toml.
[[skills.config]]path = "/path/to/skill/SKILL.md"enabled = false
Restart Codex after editing the file for the change to apply.
Security And Risk Before You Install
A skill can run scripts and shape which commands Codex proposes next, which puts it in the same category as any other software dependency, one more thing in the supply chain that someone else wrote. That’s worth taking seriously, especially for anything installed from outside OpenAI’s own catalog.
Codex has a dedicated approval category built for exactly this. Skill-script approvals sit alongside sandbox escalations, execpolicy prompts, and MCP prompts inside Codex’s granular approval policy, controlled by the skill_approval setting in config.toml. Default sandbox modes add another layer underneath that. workspace-write keeps file changes inside the working directory and blocks network access unless a project opts in. danger-full-access removes both limits and should stay reserved for situations where everything running is already trusted.
Independent research on third-party agent skills backs up the caution. AgentTrap, a 2026 academic benchmark, tested 141 tasks across 16 supply-chain risk categories and found the most dangerous failures weren’t obvious jailbreaks. Models often completed the visible task a user asked for while treating an unsafe side effect buried inside the skill as a normal part of the workflow. Separately, a 2026 scan reported by security researchers at Snyk found that more than a third of agent skills checked across community registries contained some form of prompt injection, a reminder that the risk lives as much in a skill’s written instructions as in any script bundled with it.
A short checklist covers most of the practical ground.
- Read the
SKILL.mdfile and any bundled scripts before installing anything outside the official catalog - Keep
skill_approvalinteractive for unfamiliar skills, rather than setting a blanket never - Stick to a small number of sources with a real track record, OpenAI’s own catalog first, and a well-known, actively maintained repository for anything else
- Treat every skill exactly like a new dependency, because that’s what it is
Frequently Asked Questions
What are Codex skills?
A Codex skill is a folder containing a required SKILL.md file, plus optional scripts, references, and asset folders, that packages a repeatable workflow for Codex to follow. Codex activates a skill either explicitly, by naming it with a $ command, or implicitly, when a prompt matches the skill’s description. OpenAI shipped the feature in December 2025, and the catalog has grown to include both an official set and a fast-growing community layer.
Do Codex skills slow Codex down or use more tokens?
Not meaningfully. Codex only loads each installed skill’s name, description, and file path at the start of a session, capped at roughly 2 percent of the context window. The full SKILL.md file only gets read once Codex actually decides to use that skill, so a setup can carry dozens of skills without crowding out the working prompt or slowing responses down.
What’s the difference between a Codex skill and an MCP server?
A skill teaches Codex how to do something, a folder of instructions it follows once picked. MCP, the Model Context Protocol, gives Codex somewhere new to reach, a live external service like Figma or Linear, connected over a real network transport rather than static markdown. Some official skills combine both, using a skill to supply the workflow and MCP to supply the live connection.
How do you install a Codex skill?
Official catalog skills install with one command inside Codex, skill-installer followed by the skill’s name, which pulls from OpenAI’s github.com/openai/skills repository by default. Community skills need the full GitHub path or tree URL instead. Skills can also be added by hand, copying the folder into the personal skills directory, or into a repository’s skills folder for a project-shared skill.
Are Codex skills safe to install?
Only as safe as the source. Codex has a dedicated approval category, controlled by the skill_approval setting, that prompts before a skill’s scripts run, separate from sandbox and MCP approvals. Independent research has found prompt injection in a meaningful share of community agent skills, so reading the SKILL.md file and any bundled scripts before installing anything outside OpenAI’s own catalog is worth the extra minute.
Can MCP360 work as a Codex skill?
Yes. MCP360 ships ready-to-use .md skill files, one per focused task like currency conversion or a keyword check, that install into Codex the same way any other skill does, with no MCP server to stand up. Each file is scoped to one job by design. For reaching several of MCP360’s tools in the same session, its Unified Gateway integration, a single live MCP connection, is the better fit.
Can you install Codex skills that aren’t in OpenAI’s official catalog?
Yes. Community developers publish skills through their own GitHub repositories rather than OpenAI’s curated catalog. Install one with skill-installer’s repository and path option, or by copying the skill folder in by hand. Superpowers and MCP360’s own .md skill files are two examples covered here, alongside a community-built Excalidraw skill for generating and checking editable diagrams.
What’s the best Codex skill to start with?
It depends on the repeated task. Skill Creator is a strong first install since it ships built in and turns any workflow explained twice into a permanent skill. For teams already relying on outside tools, MCP360’s currency or keyword-check skill files, GitHub CI Fix, or Superpowers, the better starting point is whichever one removes a task done weekly, not the newest name on a list.
Conclusion
Codex skills are still a young feature, but the direction is already clear. Skills are moving beyond simple instruction files and starting to work alongside plugins, scripts, and MCP connections. The official Figma skills show what that future looks like: the skill defines the workflow, while MCP provides access to live external data.
That does not mean every useful workflow needs a large bundle or an external integration. Narrow skills will remain valuable because they solve one repeated task well. At the same time, packages like Superpowers show how multiple skills can be combined into a complete development methodology rather than a single command.
The best way to adopt skills is to start with repetition, not popularity. Look for tasks you explain to Codex every week, turn one of them into a skill, and measure whether it reduces prompting, review time, or mistakes. Keep the skills that create a visible improvement and remove the ones that add more complexity than they save.
Before installing a third-party skill, inspect its SKILL.md, review every bundled script, check what files and services it can access, and keep skill_approval enabled until the source has earned your trust.
Start with one or two skills tied to real work. A small, trusted set that removes repeated effort is more useful than a large catalog Codex rarely needs.

Article by
RajniAI & Tech | Senior Content Writer
Rajni is a senior content writer covering AI agents, automation, and no-code tools. She writes across the AI space, from chatbots and customer support to MCP and agent workflows, focused on how businesses actually put these tools to work.