


The TL;DR
Adding an MCP server to Gemini CLI takes one command or one JSON edit, but your account access now determines whether you can use the guide at all.
-
• Two Setup Paths
Gemini CLI supports both the
gemini mcp addcommand and a manual edit tosettings.json. Both produce the same result, and this guide uses MCP360 as the worked example for each method. -
• Check Your Access First
Gemini CLI stopped serving free, Google AI Pro, and Ultra accounts on June 18, 2026. You now need an enterprise Gemini Code Assist license or a paid Gemini API key to follow the setup.
-
• One Token Instead of Repeated OAuth
Gemini CLI’s OAuth flow for MCP servers has a history of session-expiry failures. Using a gateway authenticated with a static API key avoids repeated OAuth sessions and removes that failure point by design.
Gemini CLI is useful out of the box for working with code, running shell commands, and searching the web. But it cannot automatically access private tools such as your CRM, internal database, project management system, or authenticated APIs.
MCP closes that gap. Once you connect an MCP server, Gemini CLI can retrieve live data and perform approved actions inside the systems your team already uses. Instead of guessing from outdated training data, it can check the current source, call the right tool, and return a grounded result.
This blog shows both supported setup methods, how to choose the correct transport, and how authentication works in practice. It also explains the Gemini CLI access changes introduced in June 2026, so you can confirm your account is eligible before spending time debugging a setup that cannot connect.
What Is Gemini CLI
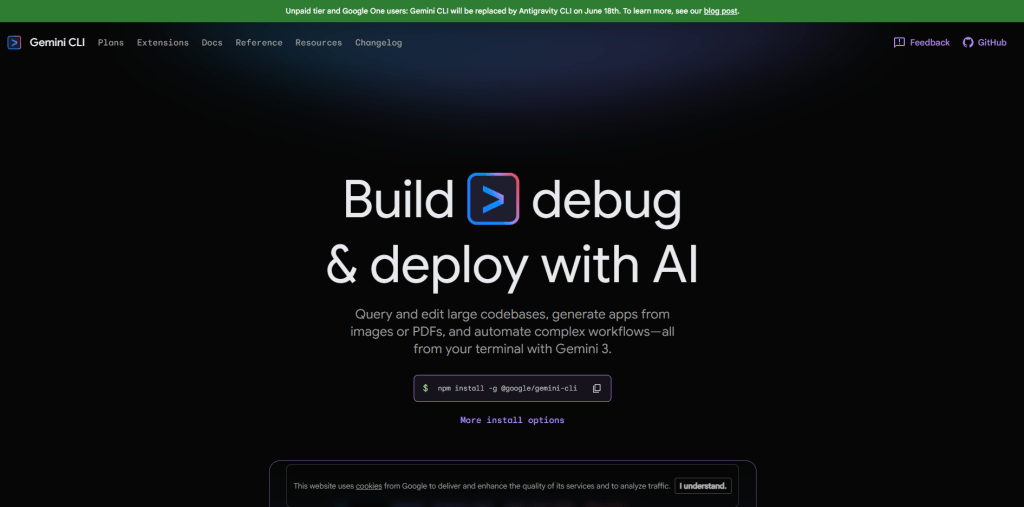
Gemini CLI is Google’s open-source AI agent for the terminal. Primarily written in TypeScript and released under the Apache 2.0 license, it brings Gemini models and agentic workflows directly into the command line rather than limiting them to an editor extension.
Unlike a basic command-line chatbot, Gemini CLI can plan and carry out multi-step tasks using built-in tools. It can inspect a codebase, edit files, run shell commands, search and fetch information from the web, troubleshoot errors, and continue working through a task based on the results of earlier actions.
Its built-in capabilities include:
- Reading, creating, and editing files in your project
- Running shell commands and development tools
- Using Gemini models for reasoning, code generation, and debugging
- Grounding responses with web search and page fetching
- Connecting external tools and private systems through MCP servers
Gemini CLI is updated frequently, with separate stable, preview, and nightly release channels. Stable builds are published weekly, while nightly builds contain the latest changes but may be less reliable. You can check your installed version with:
gemini –versionGemini CLI requires Node.js 20 or newer. Install the latest stable version globally with:
npm install -g @google/gemini-cliOr run it without a permanent installation:
npx @google/gemini-cliThe official documentation also lists Homebrew, MacPorts, Anaconda, container, and source-based installation options.
What MCP Adds to Gemini CLI
Gemini CLI already has useful built-in tools for reading and editing files, running shell commands, and searching the web. Those capabilities work well for local development and public information, but accessing private business systems usually requires additional credentials, integrations, and clearly defined actions.
Without an MCP connection, Gemini CLI may need custom scripts, installed SDKs, environment variables, and manually maintained commands for each external system. MCP provides a standardized way to expose those systems as tools and resources that Gemini CLI can discover and use during a task.
- Authenticated APIs : Checking live billing, account usage, subscriptions, or customer records usually requires authenticated API access. You could build a script for each service, but an MCP server can expose those operations as defined tools with structured inputs and outputs.
- Private Databases and Internal Systems : Internal schemas, customer records, ticketing systems, and private knowledge bases are not available through public web search. An MCP server can provide controlled access to approved queries and actions without exposing the entire underlying system.
- Subscription and Proprietary Data : Keyword rankings, paid research tools, private analytics, and other subscription-gated data cannot be reliably retrieved through ordinary search. MCP can connect Gemini CLI directly to the authorized service and return current results.
- Structured Data and Repeatable Workflows : Web search is useful for discovery, but it usually returns pages, links, and snippets rather than consistent records. MCP tools can return structured product data, pricing fields, account details, or analytics results in a format Gemini CLI can use in later steps.
- Specialized Infrastructure Tools : DNS, WHOIS, cloud infrastructure, monitoring platforms, and deployment systems may be accessible through shell utilities, but that depends on the local environment and credentials. MCP turns those capabilities into reusable tools with clearer permissions and predictable behavior.
An MCP server is a local or remote program that exposes approved tools, resources, and workflows through the Model Context Protocol. Once registered, Gemini CLI connects to the server, discovers what it provides, and can invoke those capabilities in response to natural-language requests.
That changes the quality of the result. Instead of estimating from public or outdated information, Gemini CLI can query the authorized source and return live, structured data or perform an approved action in the connected system.
Who Can Still Use Gemini CLI After June 18, 2026?
Before configuring an MCP server, confirm that your Gemini CLI authentication method is still supported. On June 18, 2026, Google stopped serving Gemini CLI requests for free individual users and Google AI Pro and Ultra subscribers. Those users are now directed to Antigravity CLI instead.
Gemini CLI continues to work for two groups:
- Organizations using Gemini Code Assist Standard or Enterprise
- Users authenticating with a supported paid API key instead of a personal Google sign-in
Google’s official transition notice confirms that enterprise customers and API-key authentication remain unaffected.
The open-source Gemini CLI repository still exists, and the software can still be installed and updated. The important change is service access: a personal free, Pro, or Ultra account can no longer authenticate Gemini CLI requests through the previous consumer login flow.
To avoid wasting time on MCP troubleshooting, run Gemini CLI and verify authentication before editing settings.json or registering a server. If your personal Google sign-in is rejected, your practical options are to use supported paid API-key authentication, obtain a Gemini Code Assist Standard or Enterprise license, or migrate to Antigravity CLI.
Once Gemini CLI successfully accepts your credentials, the MCP setup steps in the rest of this guide remain applicable.
Gemini CLI MCP Transports: Stdio, SSE, and Streamable HTTP
Gemini CLI supports three MCP transports. The transport determines how Gemini CLI starts or connects to the server and which fields you need to add under mcpServers in settings.json looks like, following the same split between what MCP defines and what the command line executes.
- Stdio : Stdio runs the MCP server as a local subprocess and communicates through standard input and output. It is the usual choice for locally installed servers, development tools, and integrations that need direct access to files or applications on your machine.
A Stdio configuration normally uses fields such ascommand,args, and optional environment variables. - SSE : SSE connects Gemini CLI to a remote MCP server through Server-Sent Events. It is an older remote transport that some hosted MCP services still support, but it is mainly relevant when a provider specifically gives you an SSE endpoint.
- Streamable HTTP : Streamable HTTP connects Gemini CLI to a remote MCP server over HTTP. It is the preferred option for most newly hosted MCP services and gateways because the server runs remotely and does not need to be installed or started on your machine.
The worked example below uses Streamable HTTP because MCP360 provides a hosted endpoint that Gemini CLI can connect to directly.
MCP Servers vs Gemini CLI Extensions
Gemini CLI extensions are broader installable packages. An extension can bundle one or more MCP servers together with slash commands, hooks, agent skills, sub-agents, and context files.
Use a direct MCP configuration when you only need to connect a server. Use an extension when the integration also includes packaged commands, instructions, automation, or other Gemini CLI customizations. Gemini CLI manages these packages through the gemini extensions commands rather than the shorter gemini ext wording in your draft.
OAuth vs API Key Authentication for Gemini CLI MCP Servers
Every MCP server in settings.json needs its own entry. One behind OAuth needs its own authorization flow too, with Gemini CLI opening a browser window and storing the token in ~/.gemini/mcp-oauth-tokens.json. That’s fine for one server. Add a second or third, and the same setup repeats in full each time.
A March 2026 bug report shows what can go wrong here. Gemini CLI issue #23776, now closed, documented OAuth sessions dying mid-conversation once the access token expired, with the reporter’s own fix proposal attached to the report. Every tool call from that server failed until the CLI was restarted.
That specific bug is fixed now. The exposure behind it remains structural, since every OAuth server is its own credential lifecycle and its own browser redirect, a separate point where a session can break on its own.
A gateway sidesteps that structural exposure. MCP360 authenticates with a single access token embedded in its connection URL, the same credential for every tool behind it. That removes two separate problems at once:
- No OAuth handshake to expire mid-session, and no separate authorization flow to manage per tool category
- One
mcpServersentry instead of a growing block of individually authenticated entries, covering more than 100 tools across search, SEO data, e-commerce lookups, domain and DNS records, and structured web scraping
What You Need Before Adding an MCP Server
A working setup depends on a few things being in place before you touch the configuration file itself.
- Gemini CLI installed and authenticated, on one of the access paths described above. Run
gemini --versionto confirm it’s on the current release. - Node.js 20 or newer, since Gemini CLI is distributed through npm. Check with
node -v. - A decision on scope. A server you want in every project belongs in your user config at
~/.gemini/settings.json. A server specific to one codebase belongs in that project’s.gemini/settings.jsoninstead. - An MCP360 account, if you’re following the worked example below. The free tier requires no credit card and includes a monthly credit allowance across the full catalog, enough to test the setup below before deciding whether to upgrade.
With these in place, you’re ready to add the server itself.
How to Add MCP Servers to Gemini CLI
Gemini CLI supports two equivalent setup paths. A direct CLI command handles a quick connection, and a manual edit works better for anything you want committed to a project or scripted across machines. Both point at the same mcpServers configuration underneath, so the same steps apply to any HTTP-based MCP server, not just the one used here. The steps below follow the verified setup flow for the worked example.
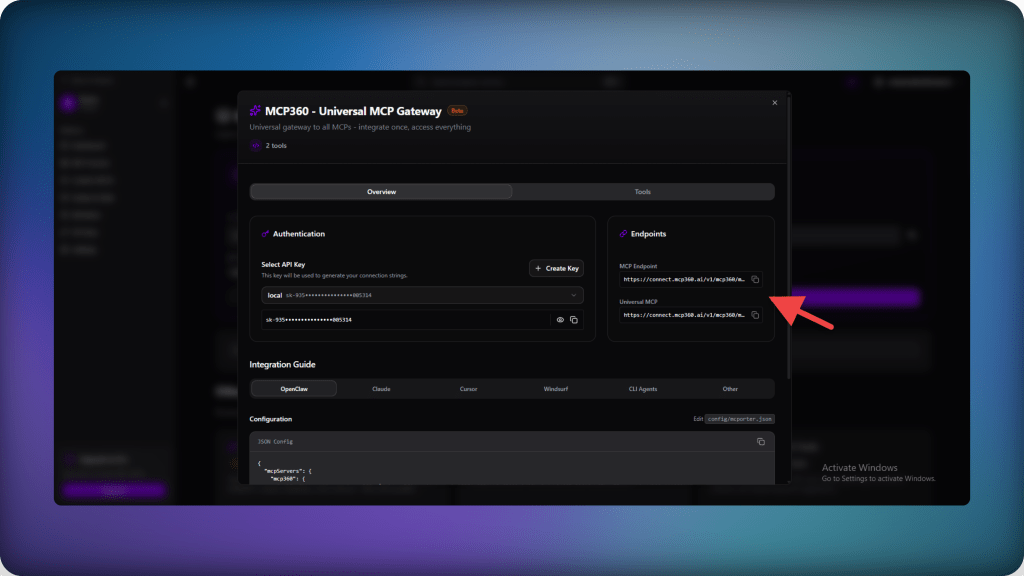
Step 1: Get Your MCP360 Server URL
The server URL for the worked example below comes from the gateway’s dashboard, not from Gemini CLI itself.
- Log in to the dashboard.
- Open an existing project or create a new one.
- Navigate to the MCP Server option in the sidebar.
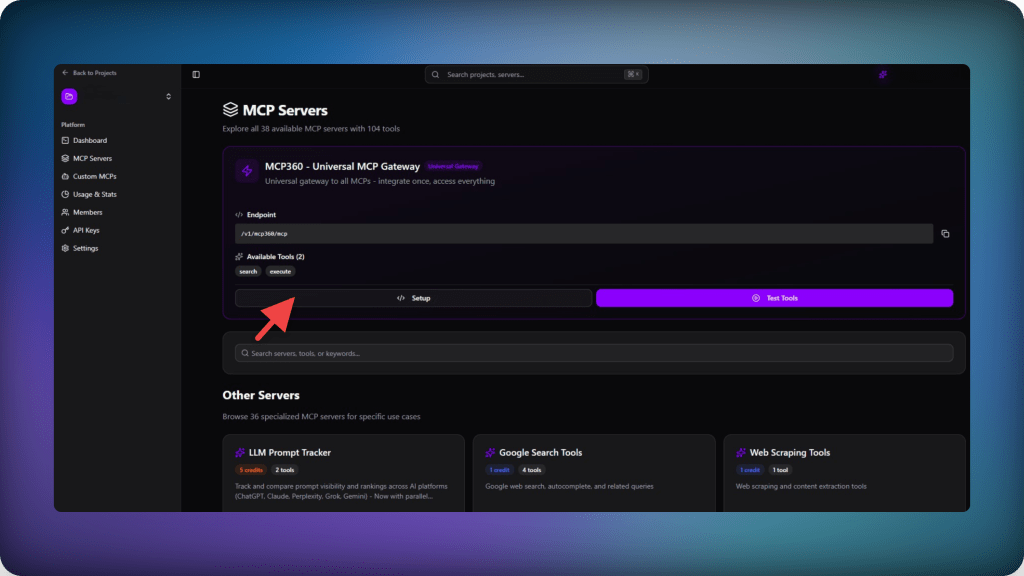
- Copy the MCP URL shown there. It carries your access token as part of the URL, so there’s no separate key to paste in later.
Step 2: Register It in Gemini CLI
- Open your terminal.
- Add this command, replacing the server name and URL with your own:
gemini mcp add -s user --transport http mcp360 "https://connect.mcp360.ai/v1/mcp360/mcp?token=YOUR_MCP360_API_KEY"
Press Enter to run it. The -s user flag writes the entry to your user config at ~/.gemini/settings.json, so it’s available across every project rather than just the one you ran the command from. Drop that flag if you want the server scoped to the current project’s .gemini/settings.json instead.
Quoting the URL matters here, since the ?token= portion contains characters some shells will otherwise try to interpret on their own.
To configure it manually instead, open settings.json and add the mcpServers block directly:
{ "mcpServers": { "mcp360": { "httpUrl": "https://connect.mcp360.ai/v1/mcp360/mcp?token=YOUR_MCP360_API_KEY" } }}

Either way, keep the URL out of any file you commit to version control since the token travels inside it. The direct command above also leaves it sitting in your shell history, which is fine for a quick local test but not for anything you’ll reuse. For that, reference the token through environment variable expansion instead, for example "httpUrl": "https://connect.mcp360.ai/v1/mcp360/mcp?token=$MCP360_API_KEY", and set MCP360_API_KEY in your shell profile rather than hardcoding it.
Step 3: Verify the Connection
Registering the server is only half the job. The rest is confirming Gemini CLI can actually reach it.
- Open Gemini CLI. If it was already running in another window, restart it, since configuration changes only take effect on startup.
- Run
/mcpinside the CLI to view the added server. MCP360 should show asCONNECTED, with a list of the tools it registered.

- Try a tool-dependent prompt to confirm real execution, for example asking Gemini to look up current search volume for a keyword or check a domain’s WHOIS record, then check the response against what you’d expect from a live lookup rather than a guess.
A successful response here confirms the tool call reached the gateway and returned real data, not a placeholder.
Gemini CLI MCP Use Cases
Once the connection is live, the practical difference shows up in how research and verification work inside a session.
- Research stays inside the terminal session: Keyword volume, SERP position checks, and competitor pricing lookups happen in the same conversation as the code or content you’re working on, without tabbing to a browser and pasting results back in.
- Content and SEO workflows get real numbers: A content brief or a technical audit can pull actual search volume and difficulty scores instead of Gemini estimating them from training data that’s already stale on anything published this year.
- Domain and infrastructure checks run inline: WHOIS, DNS records, and webpage metadata become tool calls Gemini can make mid-task, useful for anyone scripting checks across a list of domains or verifying a deployment.
- Scraping replaces one-off parsing scripts: Pulling structured data from a page without an API becomes a single tool call instead of code you write once and have to fix every time the page layout changes. That covers product pages, pricing tables, and search results pages alike, without a separate scraper built for each site.
- Verification and monitoring run without leaving the session: Checking a list of emails for deliverability, or a set of product listings for price changes, happens in the same conversation instead of a separate script or dashboard. The same pattern scales to a batch, catching invalid addresses before a campaign goes out or a competitor’s price move before you’d otherwise notice it.
The tools become available as soon as the server connects, with no extra configuration beyond the entry added above.
Gemini CLI MCP Security Settings and Risks
Gemini CLI locks down two things by default, both worth knowing before you connect anything beyond the gateway above. For more than what’s covered here, the current MCP security hardening guidance tracks the broader spec and NSA/CISA rules this section only touches on.
- Environment redaction: Two named keys,
GEMINI_API_KEYandGOOGLE_API_KEY, plus any variable matching*TOKEN*,*SECRET*,*PASSWORD*,*KEY*,*AUTH*, or*CREDENTIAL*, along with certificate and private-key patterns, are stripped from the environment handed to a spawned MCP server process. That’s best-effort redaction of inherited environment variables specifically, not a guarantee against every way a local process could reach a credential. - The trust flag: Left at its default of
false, thetrustproperty on a server entry keeps a confirmation prompt in front of every tool call until you approve the server. Settingtrust: trueskips that prompt entirely and should stay reserved for servers you control directly.
Two more things are on you to manage:
- The mcp-remote package: If you bridge other stdio-only servers through it, check the version first. Versions before 0.1.16 carried a critical command injection flaw (CVE-2025-6514, patched June 2025). Gemini CLI’s native
httpUrlsupport means the setup above skips that wrapper entirely, one fewer dependency to keep patched. - Untrusted tool output: Treat any tool’s output like text pasted from an unfamiliar website. A scraping or search tool can return content built to manipulate the model, and that risk applies to any MCP server, not one vendor.
Gemini CLI MCP Troubleshooting: Common Errors and Fixes
Most connection problems with Gemini CLI trace back to a handful of causes, each with a specific fix.
- Server shows
DISCONNECTEDin/mcp: Confirm the URL is wrapped in quotes and the?token=value has no typos or stray line breaks. Run the CLI with--debugfor verbose connection logs
. - No tools appear after connecting: Run
/mcpto check discovery state. IfincludeToolsorexcludeToolsis set on the entry, confirm it isn’t filtering out the tools you expect. - OAuth flow hangs with no browser prompt: Gemini CLI’s OAuth flow needs both a browser and a localhost callback on the same machine the CLI is running on, so this isn’t fixable from an SSH session, a headless environment, or most containers. For those cases, connect a server that supports static-token or header-based authentication instead, the same approach used throughout this guide.
- Tool calls time out: The default timeout is 600,000 milliseconds, but a slow server can still exceed it under load. Raise the
timeoutvalue in that server’s block. - Changes to
settings.jsondon’t take effect: Gemini CLI reads MCP configuration at startup only. A save alone doesn’t apply it, so restart the CLI completely. - Tool permissions or policies behave inconsistently: Check the server name for underscores. Gemini CLI’s policy parser splits fully qualified tool names on the first underscore after the
mcp_prefix, so a server namedmy_servercan cause permission rules to silently misfire. Use hyphens instead, as inmy-server.
If none of these match what you’re seeing, the broader connection troubleshooting guide covers failure points that aren’t specific to Gemini CLI.
Frequently Asked Questions
What is Gemini CLI?
Gemini CLI is Google’s open-source, terminal-based AI agent, built in TypeScript and released under an Apache 2.0 license. It runs from the command line instead of an editor window, reading and editing files, executing shell commands, and calling Gemini models directly for reasoning and code generation. The project has drawn more than 105,000 stars on GitHub and installs through npm or npx.
What is an MCP server?
An MCP server is a small program, local or remote, that exposes a defined set of callable tools to an AI agent through the Model Context Protocol. Instead of a model guessing at live data from outdated training knowledge, an MCP server lets it check a real API response, query a database schema, or read from an internal system directly, then use that answer in its response.
Is Gemini CLI still free to use?
Not for individual accounts. Since June 18, 2026, Gemini CLI has stopped authenticating free, Google AI Pro, and Google AI Ultra accounts signed in with a personal Google login. It still works for two groups, organizations on a Gemini Code Assist Standard or Enterprise license, and anyone running it with a paid Gemini API key or Gemini Enterprise Agent Platform key instead of a Google sign-in.
How do I add an MCP server to Gemini CLI?
Run the gemini mcp add command from your terminal with the server’s transport type, name, and URL, or add the same details manually to the mcpServers block in settings.json. Both methods produce an identical result. MCP360 works as a live example of this setup, since one entry gives Gemini CLI access to its full tool catalog through a single connection instead of one entry per tool.
Why does Gemini CLI keep losing its connection to an OAuth-authenticated MCP server?
Gemini CLI stores OAuth tokens locally, and once the access token for a connected server expires mid-conversation, every subsequent tool call from that server fails until the CLI is restarted, a behavior documented in gemini-cli issue #23776. The problem compounds with each additional OAuth server added. A gateway like MCP360 sidesteps this specific failure mode by authenticating with a single static access token instead of a per-server OAuth flow.
What is the difference between an MCP server and a Gemini CLI extension?
An MCP server is a single tool connection, configured directly in the mcpServers block of settings.json. A Gemini CLI extension is a larger package that can bundle one or more MCP servers together with context files and custom slash commands, installed as one unit with the gemini extensions install command. Adding a standalone MCP server does not require creating an extension.
Is it safe to connect third-party MCP servers to Gemini CLI?
Gemini CLI has some default protection built in. It redacts environment variables matching patterns like TOKEN, SECRET, and KEY before spawning a server process, and keeps a confirmation prompt in front of every tool call unless the trust flag is set to true for that server. Beyond that, treat any tool’s output the same way you would treat text from an unfamiliar website, since the risk applies to any MCP server, MCP360 included, not one specific vendor.
How is Gemini CLI different from Claude Code when it comes to MCP support?
Both are terminal-based AI agents that connect to MCP servers and hand their tools to the model automatically once a server registers, though the two use different configuration formats and command syntax. What does carry over is the server itself, since a gateway like MCP360 exposes the same tool catalog regardless of which CLI is calling it, so the connection does not need to be rebuilt for each tool separately.
Conclusion
Adding an MCP server to Gemini CLI takes only a few minutes through settings.json or the gemini mcp add command. The first step is making sure your current Gemini CLI access method is still supported.
Users with Gemini Code Assist Standard or Enterprise, or a supported paid API key, can follow this setup directly. MCP360 simplifies expansion by exposing multiple tools through one authenticated gateway instead of requiring a separate connection for each service.
Start with one simple tool call, confirm that Gemini CLI discovers the server correctly, and keep credentials out of shared project files. Then add more tools gradually with only the permissions they need.
Free or Pro users without a paid key should first choose between enabling supported billing or moving their MCP workflows to Antigravity CLI.
Connect MCP360 to Gemini CLI and test it with a real workflow.
Tags

Article by
RajniAI & Tech | Senior Content Writer
Rajni is a senior content writer covering AI agents, automation, and no-code tools. She writes across the AI space, from chatbots and customer support to MCP and agent workflows, focused on how businesses actually put these tools to work.